


The fonts on your website are a key component of the overall web design, without which your website might look incomplete.
Therefore, it’s important to be particular about the very choice of web fonts while designing a theme or website.
The fonts should not look modern, they should be legible and, sit well with the design of your website as well.
Recently, I bought a pair of premium web fonts from FontSpring.com for one of the projects.
However, thanks to my ignorance, I struggled a bit with their installation. Hence, I’m writing this guide to help beginners under the enter process of choosing web fonts (free and premium) and installing them correctly on their themes.
Choosing the Right Web Fonts
Tons of guides have already been written on choosing the right fonts for the web. While they are all insightful, sometimes, all you need to do is just keep it simple and think from your readers’ perspective.

Branding and Readability are the two most important criteria for choosing fonts for your website. You want to use fonts that reflect your uniqueness and are still compelling enough for your visitors. Whatever fonts you choose, be sure to factor in legibility – think about the letter spacing, line spacing, font-weight, and font styles beforehand.
For example, I have seen many themes that don’t use media queries for responsive headings; as a result, the headings take too much space above the fold on mobile devices.

The point is you need to consider the user experience while using the fonts on your website. The right font is a critical component of online storytelling.
Free Fonts vs Premium Fonts
When it comes to choosing fonts for your website, you have a host of options to choose from. There are tons of free fonts available online which can fit your design scheme. For example, Google Fonts is the most popular fonts library offering plenty of choices. You can pair fonts and see the best fit for your project before installing them on the final version of your website.


However, many designers go beyond the free fonts territory and search for premium fonts to make their designs unique. There are many fonts foundries (those who build fonts) and fonts distributors out there. All you have to do is check out their offers and buy from the best distributor. Oftentimes, you might find your desired fonts to be too expensive for your project, but take heart – there are always some other fonts that look exactly the same and are available either at cheaper prices. Here are some places where you can go hunting for your favorite premium fonts.
- Typekit
- FontSpring
- Fontdeck
- Fonts Live
- Type Front
- Fonts.com
Smashing Magazine has reviewed all of these font distributors and many more in this excellent piece.
Things to Keep in Mind: While premium fonts are great, they usually are limited to page views. Most premium fonts are available with a 10,000 page views limit, meaning they will work as long as your page views don’t exceed above 10,000. Naturally, subscriptions that allow higher page views count cost higher. The good news is, if you shop around, you’re likely to get fonts on discounts somewhere. In my search for Futura Fonts, I found that Functions Pro looked exactly similar. To my luck, FontSpring was offering the fonts on discounts. Also, these fonts had no restrictions on either page views count or the number of websites on which I could use them. I grabbed the opportunity in both hands. Hence, make sure to shop around or subscribe to their newsletter to grab the offers.
Installing Google Fonts
As mentioned earlier, Google Fonts is a great source for choosing your web fonts. The best part is they offer a huge number of free fonts and offer a simple interface for you to compare fonts and learn how to use them on your site. I have written two guides on using Google Fonts. Check them out below.
Installing Premium Fonts
Depending on where you buy the fonts, the process of installing premium fonts can be a bit different. However, in most cases, you have to upload some files to your theme folder and then use some CSS code to make it happen.
Before you buy any particular fonts, I’d recommend testing their demo version on your website to get a first-hand experience.
Whether you test demo fonts or install fonts with a license, you can follow the process below. In this post, I’ll walk you through how to test a demo front version on your site.
Download the Font: Before you’re able to download, you should register yourself as a user. For example, I was able to download the Sofia Pro fonts from FontSpring.com to test them out. Please, keep in mind, the demo fonts usually come with some missing characters to protect them from abuse. Unzip the downloaded folder which typically contains the entire family. Here’s what it looks like:
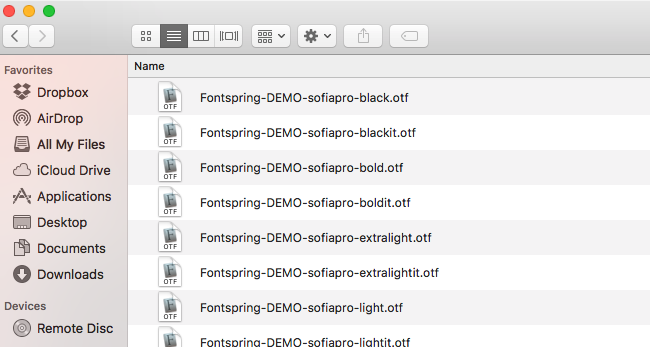

As you can see the demo font files are available in .oft file format. However, you will need to use more than just one format to make them appear on all browsers, which brings us to the next step.
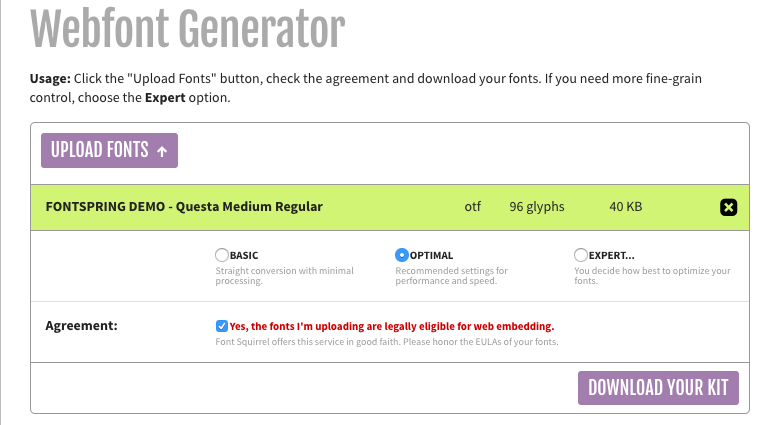
Webfont Generator: Webfont Generators create different formats of your web font files such as .woff files and the css code required to try out the demo fonts on your site. I used Font Squirrel’s Webfont Generator to generate Questa Medium Regular. Here’s what it looks like:

The Webfont Generator lets you download your font kit in zipped folder. When you unzip it, you can see a css file and two files in .woff fomrat. Here’s what it looks like:
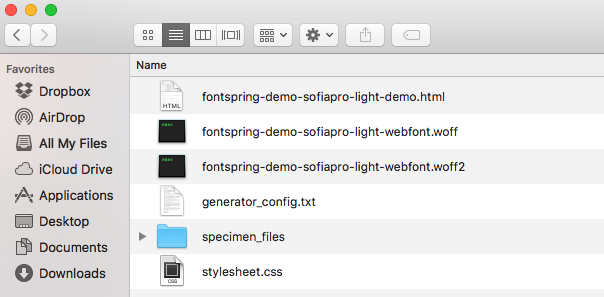

There are two things you need to do here:
Step #1: Upload the two files (.woff and .woff2) to the root of your active theme.
Step #2: Open the stylesheet.css file in the downloaded folder, copy the css code and paste it near the top of the stylesheet of your active theme. Here’s what the css code look like.
@font-face {

font-family: 'sofia_prolight';

src: url('fontspring-demo-sofiapro-light-webfont.woff2') format('woff2'),

url('fontspring-demo-sofiapro-light-webfont.woff') format('woff');

font-weight: normal;

font-style: normal;

}
Test Your Demo Fonts: Now that hard work is done, simply replace your existing font family with the demo font family name, save your the changes, and refresh your browser. You can also use Chrome’s inspect element feature to test your fonts.
Installing TypeKit Fonts
As mentioned earlier, not all premium fonts need a similar installation approach. If you want to install TypeKit fonts on your site, the process is much simpler. You needn’t download or upload any files. All you need do is make some changes in your functions.php file and add a script to your Genesis theme header. For your information, Brian Gardner has already written a post on this.
Final Thoughts
As the Internet is getting increasingly visual with the proliferation of images, gifs, and images, making your website visually appealing is more important than ever. With the right web fonts, you can turn a dull site into a stunning piece of art. Go ahead and make it happen!